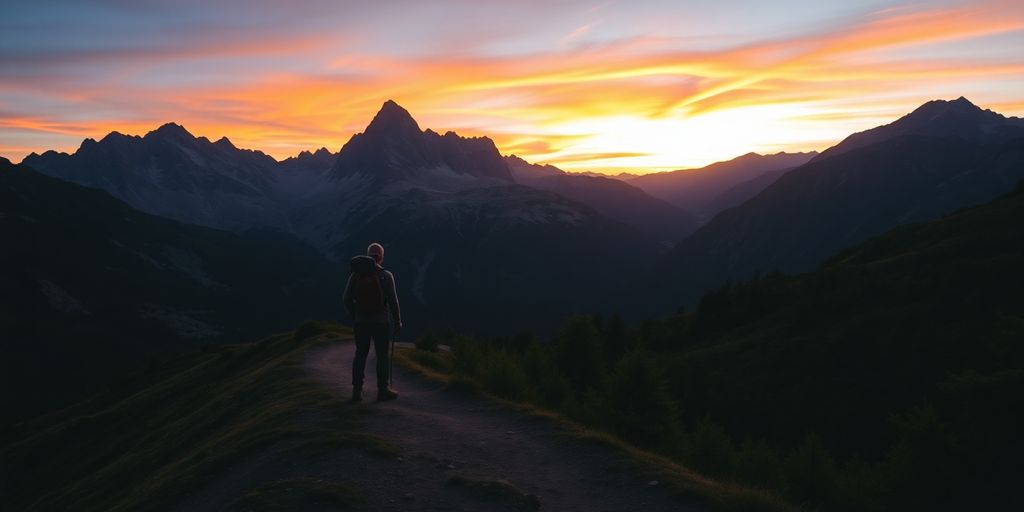
Ever wondered how long that trail really takes? It's not just about the miles; lots of stuff changes your hiking time. This guide will help you figure out how long your hikes will be, so you can plan better and have more fun out there.
Key Takeaways
- Your personal speed and the trail's difficulty really change your hiking time guide.
- Hills and tricky ground make your hiking time guide longer, so plan for that.
- Weather, like rain or wind, can slow you down and impact your hiking time guide.
- What you carry and what's on your feet affect your hiking time guide a lot.
- Hiking with others means you need to think about everyone's speed for your hiking time guide.
Getting Started: Your Hiking Time Guide Foundation
Alright, let's get this hiking party started! Before you even lace up those boots, it's super important to understand the basics of estimating how long your hike will actually take. No one wants to be stuck on a trail after dark, right? This section is all about setting you up for success, so you can plan your adventures with confidence. Let's jump in!
Understanding Your Pace and Trail Type
Okay, so first things first: your pace. Are you a speed demon or more of a leisurely stroller? Knowing your average walking speed is key. Also, not all trails are created equal. A flat, well-maintained path is a whole different ballgame than a rocky, overgrown one. Here's a quick breakdown:
- Easy Trails: Flat, smooth, and well-marked. Great for beginners.
- Moderate Trails: Some elevation gain, possibly rocky sections.
- Difficult Trails: Steep inclines, uneven terrain, and potentially exposed areas.
Consider these factors when planning your hike. A good rule of thumb is that the average person hikes at about 2 miles per hour on flat terrain. But remember, that's just a starting point. You'll need to adjust based on the trail's difficulty and your personal fitness level. For example, if you are planning a day hike, you should consider the trail conditions.
Quick Tips for Estimating Hiking Time
Alright, let's get down to brass tacks. Here are some quick and dirty tips for figuring out how long your hike will take:
- Use the "Naismith's Rule": This classic rule estimates 1 hour for every 3 miles hiked, plus an additional 30 minutes for every 1,000 feet of elevation gain. It's not perfect, but it's a solid starting point.
- Check Trail Reviews: Websites and apps like AllTrails are your best friends. Read what other hikers have to say about the trail's difficulty and how long it took them to complete it.
- Be Realistic About Your Fitness: Don't overestimate your abilities. If you're not in great shape, add some extra time to your estimate. It's always better to err on the side of caution.
Remember, these are just estimates. Weather, trail conditions, and your group's abilities can all impact your hiking time. Always be prepared for the unexpected.
Why Every Minute Counts on the Trail
Time management on the trail isn't just about sticking to a schedule; it's about safety and enjoyment. Running out of daylight can turn a pleasant hike into a stressful situation. Plus, being mindful of time helps you make smart decisions about when to take breaks, when to turn back, and how to conserve energy. Every minute you save by being prepared and efficient adds up to a safer and more enjoyable experience. Think of it like this:
- Safety: Avoiding hiking in the dark.
- Comfort: Having enough time for breaks and enjoying the scenery.
- Flexibility: Allowing for unexpected delays or changes in plans.
Mastering the Terrain: Adjusting Your Hiking Time Guide
Alright, let's talk about the fun part – the actual terrain! It's not just about distance; what you're walking on (or climbing over) makes a HUGE difference in how long your hike will take. We're going to break down how to adjust your hiking time based on what the trail throws at you. It's all about being prepared and knowing what to expect. Let's get into it!
Conquering Uphill Challenges
Uphill hikes? Yeah, they're tough. But with the right approach, you can tackle them without completely destroying your pace. Here's the deal:
- Elevation Gain: This is the big one. The steeper the climb, the slower you'll go. A good rule of thumb is to add about an hour for every 1000 feet of elevation gain over your estimated flat-ground time. Use a hike difficulty rating scale to help you plan.
- Breaks are Key: Don't be a hero. Take short, frequent breaks to catch your breath and let your muscles recover. Seriously, a minute or two every 15 minutes can make a world of difference.
- Pace Yourself: Start slow and steady. Don't burn all your energy in the first half hour. Find a rhythm that you can maintain for the long haul.
Remember, it's not a race. Enjoy the view, listen to your body, and adjust your pace as needed. The goal is to reach the top feeling good, not completely wiped out.
Navigating Tricky Downhill Sections
Downhill might seem easier, but it can be surprisingly challenging. It's all about control and avoiding injury. Here's what to keep in mind:
- Control Your Speed: Don't let gravity do all the work. Use your leg muscles to control your descent and prevent yourself from picking up too much speed.
- Watch Your Footing: Loose gravel, slippery rocks, and uneven terrain can all lead to falls. Pay attention to where you're stepping and choose your path carefully.
- Use Trekking Poles: These are a lifesaver on steep descents. They help to take some of the pressure off your knees and provide extra stability.
The Impact of Trail Surfaces on Your Pace
What you're walking on matters! Different trail surfaces affect your speed and energy expenditure. Here's a quick rundown:
- Smooth Dirt: This is the ideal surface. You can maintain a good pace and conserve energy.
- Rocky Terrain: Rocks slow you down and require more effort. Watch your step and be prepared to adjust your pace.
- Sandy Trails: Sand is tough! It's like walking on the beach – your feet sink in, and it takes more energy to move forward. Shorten your stride and be patient.
- Muddy Conditions: Mud can be slippery and slow. Wear waterproof boots and be prepared to get dirty. Consider how essential gear can help you in these conditions.
| Trail Surface | Impact on Pace | Tips |
|---|---|---|
| Smooth Dirt | Minimal | Enjoy the easy walking! |
| Rocky Terrain | Moderate | Watch your step, use trekking poles. |
| Sandy Trails | Significant | Shorten your stride, stay hydrated. |
| Muddy Conditions | High | Wear waterproof boots, be careful. |
Weather Wisdom: How Conditions Affect Your Hiking Time Guide
Weather, man, it's the ultimate wildcard when you're out on the trail. You can plan everything else to a T, but Mother Nature? She does what she wants. And that definitely includes messing with your hiking time. Let's break down how different conditions can impact your pace and what you can do about it.
Sunny Day Strolls vs. Rainy Day Rambles
Okay, let's be real: a sunny day hike is usually a dream. You're feeling good, the views are amazing, and you can generally keep a steady pace. But don't get too cocky! Heat can be a real energy zapper. You'll need to factor in more breaks and essential gear to stay hydrated and avoid overheating.
Rain, on the other hand, is a whole different beast. Trails become slippery, visibility drops, and your gear gets heavier. Expect to slow down significantly. Plus, the mental drain of hiking in the rain is real. It's not just about the physical challenge; it's about staying positive when you're soaked and miserable.
Windy Woes and How to Handle Them
Wind can be sneaky. A light breeze might feel refreshing, but a strong headwind? That's like hiking against an invisible wall. It'll tire you out way faster than you think. Side winds can also throw you off balance, especially on narrow trails.
Here's the deal with wind:
- Check the forecast before you go. Seriously.
- Dress in layers to protect yourself from wind chill.
- Consider using trekking poles for added stability.
Hiking in windy conditions can be dangerous, especially at higher elevations. Be prepared to turn back if the wind becomes too strong. Your safety is way more important than reaching the summit.
Temperature's Role in Your Hiking Speed
Temperature is a big one. Extreme heat or cold can seriously mess with your hiking time. In hot weather, your body works overtime to stay cool, leading to fatigue and dehydration. In cold weather, you're burning extra calories just to stay warm.
Here's a quick guide:
- Hot Weather (80°F+): Reduce your pace by 20-30%. Take frequent breaks in the shade. Drink plenty of water.
- Moderate Weather (60-79°F): Maintain a normal pace. Stay hydrated.
- Cold Weather (40-59°F): Add 10-15% to your hiking time. Dress in layers. Eat high-energy snacks.
- Extreme Cold (Below 40°F): Hiking is not recommended without proper gear and experience. Increase hiking time by 30-50% or more. Be aware of hypothermia and frostbite.
Remember, these are just guidelines. Your personal tolerance for heat and cold will vary. Always listen to your body and adjust your pace accordingly. And don't forget to pack extra snacks and water – you never know when the weather might throw you a curveball. Keep an eye on the trail conditions and be prepared to adjust your plans.
Packing Smart: Gear's Influence on Your Hiking Time Guide
Lightening Your Load for Faster Hikes
Okay, let's talk about weight. Seriously, every ounce counts! Think about it: lugging around a super heavy pack is like carrying a toddler on your back the whole time. Not fun, and definitely slows you down. The lighter your pack, the faster and more efficiently you can hike.
- Ditch the extras: Do you really need that third book? Probably not.
- Choose lightweight gear: Invest in lighter versions of your tent, sleeping bag, and cookware.
- Repackage food: Leave the bulky packaging at home and use resealable bags.
I remember one time I packed way too much food "just in case." Ended up carrying an extra five pounds of snacks I didn't even touch. Lesson learned: plan your meals carefully and only bring what you need.
Essential Gear for Every Adventure
Alright, so we're aiming for light, but not too light. There's a difference between being minimalist and being unprepared. Here's a quick rundown of must-haves:
- Navigation: Map, compass, and GPS (and know how to use them!).
- Protection: Sunscreen, sunglasses, and a hat.
- First-aid: A well-stocked kit for minor injuries and emergencies. Don't forget appropriate clothing!
- Hydration: Water bottles or a hydration reservoir.
The Right Footwear Makes All the Difference
Footwear is where it's at, people! Your feet are your engines on the trail, so treat them right. Blisters and sore feet can turn a great hike into a miserable slog.
- Choose the right type: Hiking boots, trail runners, or hiking shoes, depending on the terrain.
- Break them in: Don't wear brand-new boots on a long hike. Trust me on this one.
- Wear good socks: Moisture-wicking socks are your best friend. Avoid cotton at all costs.
| Footwear Type | Terrain Suitability | Weight (per pair) | Pros | Cons |
|---|---|---|---|---|
| Hiking Boots | Rugged, uneven | 2-3 lbs | Ankle support, durable, waterproof | Heavy, can be stiff |
| Trail Runners | Moderate trails | 1-2 lbs | Lightweight, breathable, flexible | Less ankle support, less durable |
| Hiking Shoes | Easy to moderate | 1.5-2.5 lbs | Good compromise between boots and runners | Less ankle support than boots, less durable |
Group Dynamics: Optimizing Your Hiking Time Guide with Friends
Hiking with friends? Awesome! It's a totally different ballgame than solo trekking. You're not just thinking about your own pace anymore; you're part of a team. Let's make sure everyone has a blast and you stick (relatively) to your planned hiking time.
Finding Your Group's Rhythm
Okay, so you've got your crew. Now what? First, figure out everyone's general fitness level and hiking experience. This is super important because you don't want to leave anyone in the dust or get stuck waiting forever. A good way to do this is to chat beforehand about recent hikes or workouts. If you have a mixed group, aim for a pace that suits the least experienced hiker. It's better to go a bit slower and enjoy the scenery than to push too hard and risk someone getting injured or burnt out. Consider a shorter, easier trail type for the first group hike to gauge everyone's abilities.
Communication is Key for Smooth Progress
Seriously, talk to each other! Before you even hit the trail, discuss the plan: the route, expected time, and any potential challenges. During the hike, keep checking in. Is everyone feeling good? Does anyone need a break? Don't be afraid to adjust the plan if needed. Maybe that steep incline is proving tougher than expected, or someone's knee is acting up. It's okay to turn back or find an alternate route.
Here's a quick communication checklist:
- Pre-hike briefing: Route, time, challenges
- Regular check-ins: "How's everyone doing?"
- Open to adjustments: Change the plan if needed
Remember, the goal is to have fun and stay safe. Good communication makes all the difference.
Making Memories, Not Just Miles
Look, hiking isn't just about crushing miles; it's about enjoying the experience with your friends. Take breaks to soak in the views, snap some photos, and share some laughs. Don't be so focused on the time that you forget to appreciate the journey. Pack some snacks to share, tell stories, and just enjoy each other's company. After all, those shared moments are what you'll remember long after the hike is over. Think of it as a chance to build stronger bonds and create lasting memories. And hey, if you're running behind schedule, who cares? As long as everyone's having a good time and staying safe, that's all that matters. Remember to plan your wilderness adventure with flexibility in mind.
Beyond the Basics: Advanced Hiking Time Guide Strategies
Embracing Breaks for Better Performance
Okay, so you're trying to beat your personal best, right? But here's a secret: breaks are your friend. Seriously! Don't just power through like a machine. Short, frequent breaks can actually boost your overall hiking time. Think of it like this: a car needs to cool down, and so does your body.
- Micro-breaks (1-2 minutes): Every 30-45 minutes for hydration and a quick snack.
- Longer breaks (10-15 minutes): Every 2-3 hours for stretching and a more substantial refuel.
- Adjust based on terrain: Uphill? More frequent breaks. Downhill? Maybe you can push a little longer.
Taking breaks isn't about being weak; it's about being smart. It's about listening to your body and preventing burnout, which will ultimately slow you down more than a few well-placed pauses ever could.
Fueling Your Body for Endurance
Ever tried running a car on empty? Didn't think so. Same goes for your body on the trail. Nutrition is absolutely key to maintaining a good pace and avoiding that dreaded energy crash. It's not just about eating; it's about eating the right things at the right times. I've learned this the hard way on a few trails, trust me. A 12-week training plan can help you prepare your body for the demands of hiking.
- Pre-hike: Load up on complex carbs like oatmeal or whole-wheat toast.
- During the hike: Focus on easily digestible snacks like trail mix, energy bars, or fruit.
- Post-hike: Replenish glycogen stores with a mix of carbs and protein.
Listening to Your Body's Signals
This is probably the most important thing I can tell you. Your body is constantly sending you messages. Ignoring them is a recipe for disaster. Pay attention to those little aches, pains, and twinges. Are you feeling unusually tired? Is your knee starting to hurt? Don't push through it! Slow down, adjust your pack, or even turn back if necessary. No hike is worth injuring yourself.
Here's a simple guide:
| Signal | Possible Cause | Action |
|---|---|---|
| Muscle Cramps | Dehydration, electrolyte imbalance | Drink water, eat salty snack, stretch |
| Fatigue | Low blood sugar, exhaustion | Eat a snack, rest |
| Joint Pain | Overexertion, poor form | Slow down, adjust pack, consider turning back |
Trail Tales: Real-World Hiking Time Guide Experiences

Learning from Past Adventures
Okay, so we've all been there, right? That hike you thought would take three hours turned into a six-hour epic. Or the time you confidently told your friends, "We'll be back by lunch!" only to stumble back as the sun was setting. These experiences, while sometimes painful in the moment, are goldmines for improving your future hiking time estimates. Think of every hike as a learning opportunity. What went wrong? What went right? Did you underestimate the elevation gain? Did someone in your group need more breaks than anticipated? Keep a little mental (or actual) notebook of these things.
- Note the trail conditions.
- Track your actual hiking time versus your estimate.
- Consider the time of year and weather.
Adapting to the Unexpected
No matter how meticulously you plan, something always seems to go sideways on the trail. A sudden downpour, a wrong turn, an injury – the possibilities are endless. The key is to be flexible and adapt. If you encounter unexpected challenges, don't stubbornly stick to your original schedule. Reassess the situation, adjust your hiking excursion, and prioritize safety. Maybe that means turning back, finding an alternate route, or simply slowing down and taking more breaks. Remember, it's better to arrive late and safe than to push yourself too hard and risk an accident.
"I once planned a solo hike that was supposed to take 4 hours. I ended up twisting my ankle halfway through and had to hobble back. It took me nearly 8 hours to get back to the trailhead. Now, I always carry a satellite communicator and let someone know my exact route and expected return time."
Celebrating Every Step of Your Journey
It's easy to get caught up in the numbers – the miles, the elevation gain, the estimated time. But hiking isn't just about reaching the destination; it's about the journey itself. Take the time to appreciate the scenery, enjoy the company of your hiking buddies, and savor the feeling of accomplishment, no matter how small. Every step you take is a victory. So, whether you crush your time goal or barely make it back before dark, celebrate the experience. You're out in nature, challenging yourself, and making memories. And that's what truly matters. Remember to enjoy the best backpacking stories along the way!
Go Hit Those Trails!
So, there you have it! We've gone over a bunch of stuff to help you figure out how long your hikes might take. Remember, it's not about rushing. It's about enjoying the journey, seeing cool things, and getting some fresh air. Every hike is different, and that's part of the fun. Don't stress too much about being super precise with your timing. Just get out there, be smart about your plans, and have a great time. Happy trails, everyone!
Frequently Asked Questions
How do I figure out my hiking speed?
Figuring out your hiking speed is super important. Think about how fast you usually walk on flat ground, then imagine how that changes when you go up or down hills. Also, what kind of path are you on? A smooth dirt trail is way different from a rocky, uneven one. Knowing these things helps you guess how long your hike will really take.
How do hills and different paths change my hiking time?
When you're going uphill, you naturally slow down a lot. It takes more energy and effort. Going downhill can also be tricky; if it's steep or slippery, you'll need to go slower to stay safe. The ground itself matters too. Muddy trails, loose rocks, or thick roots can all make your pace much slower than a clear, easy path.
Does bad weather affect how long my hike takes?
Yes, the weather makes a big difference! On a sunny, calm day, you can probably move faster. But if it's raining, windy, or super hot or cold, you'll likely slow down. Bad weather can make trails harder to walk on and can also make you tired faster.
How does my gear change my hiking speed?
What you carry matters a lot. If your backpack is really heavy, you'll go slower and get tired sooner. Try to pack only what you truly need. Good shoes are also key! They protect your feet and give you a good grip, which helps you move more confidently and efficiently on different surfaces.
What's the best way to hike with a group?
When hiking with others, it's best if everyone can agree on a comfortable pace. Talk about how everyone is feeling and if anyone needs a break. Good communication helps the whole group stay together and enjoy the hike without anyone feeling rushed or left behind.
Are there any tricks to hike longer or feel better?
Taking short breaks can actually help you go further and feel better. Make sure to eat snacks and drink water regularly to keep your energy up. Most importantly, listen to your body. If you feel tired or something hurts, it's okay to slow down or rest. Pushing too hard can lead to problems.